One of the most dangerous elements impacting your roof during the winter months is ice. Even small amounts of ice buildup can create dangerous cracks and damage the roofing structure, putting the whole home at risk. One of the ways to minimize risk is with the use of heat cable. However, it is often referred to as heat tape.
Heat tape is slightly different in that it is applied to water pipes within the home to reduce the risk of them bursting or freezing. The idea is the same.
What Is Heat Cable?
Heat cable is a valuable investment in any cold climate where there is a risk of ice forming. The goal is to place this cable along areas where there is a risk of ice dams forming. This is generally along the eaves and inside the downspouts and gutters on the home. Placed properly, it works to prevent ice from forming in these areas.
Why Should You Install Heat Cable?
Heat cable, or heat tape, can help prevent ice dam buildup. Ice dams occur when snow and ice on the roof begin to melt, often due to the interior heat of the home. When this happens, the moisture travels down the roof, but before it can dry up or flow into the gutters, it freezes over again. This creates big overhangs on your roof and eaves.
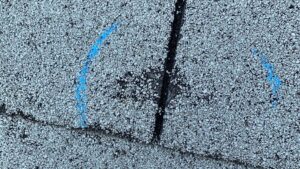
Also, the freezing and melting can cause separation between the shingles and the flashing, ultimately creating areas for water to get into your home and damaging the structure. In short, heat cable is designed to eliminate this risk by not allowing ice and snow to go through that freezing and refreezing cycle.
Steps on How to Install Heat Cable
To help you learn how to install heat tape, follow this video for some basic insight. Here’s a quick rundown of what to expect during the process.
- Measuring
Before you get started, you need to know how much cable you need. Measure the length of the roofline to get started. Then, measure the depth of the eave that overhangs from the edge of the roof straight back to the home’s wall.
If the overhang is 12 inches, multiply the roof line measurement by 4. If it is more than this, up to 24 inches, you’ll want to multiple by 5.3. If the eave depth is even higher, between 24 and 36 inches, multiply the roof line measurement by 6.8.
You also need to measure the length of the downspouts. Add this length to your overall need. You also need to measure the distance between the edge of the roof where you plan to begin the cable and the distance to the electrical outlet you’ll plug it into. This should give you an idea of the amount of cable you need.
- Routing the Cable
Only place your cable on a dry and windless day when it is safe to access the roof. Start by routing the cable from the electrical outlet you plan to use. You’ll need to clip it at the starting point to a shingle. Do this on a shingle that’s further up on the roof than the outside wall. This helps to ensure the entire roof overhang is covered.
- Create a Loop
Next, run the cable back down to the gutter. Do this at an angle so that it is forming an up and down pattern. Form it into a loop. You’ll then clip the cable to the bottom edge of the very last shingle. Most of the time, the loop should extend into the gutter at least a portion of the way.
- Continue the Process
You’ll create a zig-zag pattern along this area, running the cable up and then down to the gutter at an angle. Create a triangular shape. Aim to keep these spaced about 15 inches wide. At every high point, be sure to secure the cable using a clip.
- Move Through Gutters
You’ll need to continue this process along the roofline. Once you do that, it is then necessary to place the heat cable into the gutter itself. It can be placed along the bottom interior of the gutter, or you can attach it in loops across the gutter.
Once you hit a downspout, you’ll want to feed the cable through it, having a loop go down as far as possible. Once you continue to do this, going along the gutters, looping into the downspouts, and continuing to the end, you’ll come to the final downspout. Drop the cable into it, and it should reach the outlet.
At this point, all you need to do is to plug it in. Be sure you are only plugging it into a GFCI outlet. Once you do, be sure you feel it turning on and warming. You will not need to keep it plugged in until it begins to snow. Conserve energy by not plugging it in until that time.
How long does heat cable last?
It is always a good idea to take some time with this process to ensure you get it done properly. Be sure you attach it securely and keep the cable as close to the surface as possible. When you do this, you will get more wear and tear out of it.
Most of the time, a heat cable will last between three and five years when properly installed. Unfortunately, it does not last much longer than that because of the exposure to the weather. Buying a quality product and installing it properly is a big factor in ensuring the best possible outcome.
When You Need Help, Ask for It
There are a few different videos and tools online you can use to guide you in the addition of heat tape or heat cable to your roof. However, for some, the best option is to turn to a professional Minneapolis roofing company who can install the product for you. Reach out for help when you need to, and limit your risks of being on the roof.